 |
home gallery |
| projects philosophy faq | |
 |
free plans: how to make Wooden Letters |
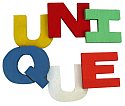
| Basic Description | What can be a better toy for a child than a colorful set of wooden letters? This is a simple, fun and very satisfying project. You can complete an entire alphabet or just create a smaller set of letters that spells something significant like the child's name. |
Once all the letters are cut out, you need to clean up the edges. You can use a disk sander and/or a spindle sander. We used a file, making sure that we only pulled the file off the edge of the wood to prevent creating even more splinters. Then we followed with sandpaper to smooth everything out. The final step, of course, is to paint or finish the letters. We used ordinary hobby paint but you could use any covering you like including polyurethane or finishing oil. For more detailed information regarding finishing, consider Understanding Wood Finishing by Bob Flexner. |
 |
 |
© 2000-2008
terms privacy policy |
home gallery |
| projects philosophy faq | ||