 |
free plans: how to make a
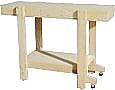
Mobile Workstand |
Basic Description
|
This simple workstand is both stable and mobile. It provides a great surface for cutting,
routing, sanding, assembly etc. You can roll it around your workspace
by simply tipping one end a few degrees to engage the wheels. In the resting position, the wheels
are disengaged and this is the key to its stability. There are no obstructions on the underside of
the worktop which allows for efficient clamping. These mobile workstands work very well in pairs, so after you
finish your first one, you may want to build another! |
You can cut the panel into 6 identical pieces which
will yield enough material for two workstands (see graphic at the right). Don't forget that your blade itself has a thickness when
you are calculating the dimensions. We cut three pieces 16" wide by 49" long (40 x 120cm). After cutting the first
piece we used it as a template to mark the second and third pieces: this ensures that all three
will have the same dimensions. If you are using a table saw, of course, the fence will take care of this.
|
 |
If you don't have a table saw, or don't feel comfortable cutting such large panels with
one, you can use a simple cutting guide and a circular saw. You can either purchase a
guide made specifically for the purpose, or you can use a sturdy rectangular bar with a pair
of small C-clamps. We used a 3/8 x
1" (1 x 3cm) aluminum bar. Make sure that whatever you use will not deflect horizontally when you are in the middle of the cut;
after you have it clamped in place, check how rigid it is in the middle.
Also don't forget to account for the distance between the saw blade
and the outside of the saw's guide. Note the block of scrap to protect the underside of the panel from the clamp
|
 |
After you have the guide clamped, make sure that the clamps will not interfere
with the circular saw as you make the cut. It is also a good idea to sight down the cut line above and below the panel to ensure that
nothing will be obstructing your cut (cord, sawhorse etc.). Before beginning such a long cut, we like to 'kiss' the piece
with the circular saw (see picture at the right), then double-check the measurement from the tiny indentation. This way if you have
made a mistake in setting up the cutting guide, you haven't wasted any wood, you can simply make the necessary readjustments. |
 |

