
|
home gallery |
| projects philosophy faq | |
 |
free plans: how to make a Curvy Stripe |
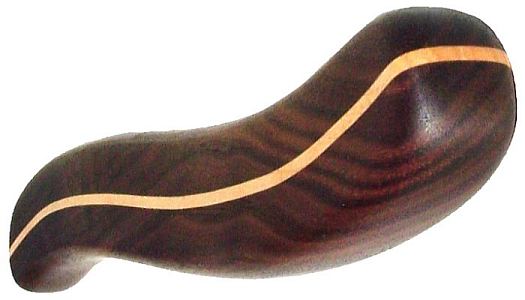
| Basic Description | In the free plan below, we illustrate a technique that that shows you how to incorporate a narrow stripe into almost any wood project. You begin with your primary wood, cut a curve, and then glue a thin sliver of a contrasting wood between. The result is a beautiful detail can be used to add sinuous curves to pulls, box tops, drawer fronts, table tops etc. |
| Materials | Wood, wood glue, finishing oil. A complete material list is provided below. |
| Tools | Table saw, bandsaw or scrollsaw, thickness planer, clamps, sandpaper. A complete tool list is provided below. |
| Cost | The plan itself is free! Estimated cost of materials: $1 |
| Time | 1 hour |
| Difficulty | Easy |
| Legal Notice | Use of this website constitutes acceptance of our terms of service policy. |

The first step involves acquiring the necessary materials and proper tools. It is best to get everything prepared and set-up before commencing because you become free to progress without unnecessary interruptions.
| Item | Qty. | Description |
| #1 | - | Base wood and contrasting wood for stripe. The base wood should be long enough for your thickness planer. |
| #3 | - | Wood glue; we used polyurethane glue but yellow glue is acceptable. |
| #4 | - | Finishing oil |
| Tool |
| table saw |
| bandsaw or scrollsaw |
| clamps |
| thickness planer |
| if you are starting with rough lumber, you will also need a jointer |
| sandpaper |
We recommend that you read through the entire plan and especially the design considerations section before acquiring/assembling all of the requisite tools and materials. There are several options with this project, and it is most prudent to be fully informed of them before making design decisions.
|
© 2000-2008
terms privacy policy |
home gallery |
| projects philosophy faq | ||